Parts of a Plant for Preschool: Teaching What Each Part Does

Updated: Sep 8

Young children are naturally curious about plants. They pick up leaves, collect seeds, notice flowers blooming, watch insects land on petals, and wonder about roots peeking through the soil.
In Montessori education, this curiosity about the natural world has always had an important place. Maria Montessori emphasized children's need for direct experiences with nature, and Montessori environments continue to give children opportunities to observe, care for, and learn from living things. Botany is woven into this experience, from caring for classroom plants to studying the parts and characteristics of plants in remarkable detail.
Even at the preschool level, children can develop a surprisingly rich botanical vocabulary. They learn about trees, flowers, leaves, roots, fruits, and seeds. Montessori materials help children isolate and examine details, and nomenclature work gives them precise language for what they are discovering. As their knowledge grows, children can explore everything from the parts of a flower to the scientific names for different leaf shapes.
But the materials are only part of the experience.
A wooden leaf shape becomes much more meaningful when a child begins recognizing that shape on a tree outside. A lesson about roots becomes more interesting when the child discovers roots hiding beneath the soil. A seed is no longer simply a vocabulary word when a child opens an apple, finds one inside, plants it, and begins wondering what might happen next.
This is where botany becomes truly exciting for young children.
From “What Is It?” to “What Does It Do?”

In the Montessori classroom, we often begin by giving children the names of the parts they can see and explore.
Using the Parts of a Tree puzzle, for example, we can isolate each part and introduce its name:
“These are the roots.”
“This is the trunk.”
“These are the branches.”
“These are the leaves. On a tree, the leaves together form the crown.”
The child can remove each piece, examine it, trace it, and return it to its place in the whole tree.
For this lesson, I like to extend the traditional tree puzzle even further by adding flowers, fruit, and seeds. These additions give us an opportunity to move beyond identifying the structures of the tree and begin exploring how they function.
So we add:
“These are the flowers.”
“This is the fruit.”
“These are the seeds.”
Once the child is familiar with the names, we can ask a different kind of question:
“What does each part do?”
Now the tree puzzle becomes the starting point for something much bigger than nomenclature. We are beginning to discover how the parts of a tree work together to help it live, grow, and reproduce.
Roots: Holding On & Taking In

I like to begin at the bottom of the plant—with a part that is incredibly important even though most of it is usually hidden from us.
Whenever possible, I let the children see real roots. We might examine a small plant with its roots exposed, look at roots growing through a clear container, or notice the large roots of a tree appearing above the soil outside.
Before explaining their function, I ask:
“Why do you think the plant has all of these roots underneath the ground?”
Then we think about what would happen without them.
"What happens when the wind blows against a tree? What keeps a tall sunflower standing in the ground? What prevents a plant from simply falling over?"
This helps us discover the roots' first important job:
Roots hold the plant in place.
The scientific word I introduce is anchor.
“The roots hold the plant firmly in the soil. We can also say that the roots anchor the plant.”
Then we investigate their second important job.
I ask the children:
“We drink water with our mouths. But plants don't have mouths like we do. So how does a plant get water?”
And I wait.
I love giving children time to think before providing the answer. Their ideas are often just as interesting as the question.
We eventually discover that roots absorb water and mineral nutrients from the soil.
When I'm speaking directly to young children, I simply say:
“Roots take in water and nutrients from the soil.”
A Quick Side Note: Water traveling through a plant can be difficult for young children to imagine. If you have time, you might show them the “Walking Rainbow” experiment. Although it isn’t a direct model of how roots absorb water from the soil (it actually demonstrates capillary action), it gives children a simple visual of how water can move through tiny spaces without anyone pushing or carrying it. This can help them begin to imagine how water moves through a plant.

So now we have two important words to remember:
ROOTS: HOLD + ABSORB
Roots hold the plant firmly in the ground and absorb water and nutrients from the soil.
Stem, Trunk, and Branches: Support & Carry

Once the children understand that roots absorb water and nutrients from the soil, I like to follow that water up the tree.
I trace my finger from the roots to the trunk, along the branches, and toward the leaves and ask:
“The roots absorbed the water down here. How do you think it gets all the way up there?”
A stem supports a plant and contains tissues that transport materials from one part to another. In a tree, the main woody stem is called the trunk, and the branches extend outward from it, supporting the leaves, flowers, and fruits.
Stems are also responsible for carrying water to the leaves and other parts of the plant. Stems—including the trunk and branches of a tree—contain specialized tissues that act almost like pathways through the plant. One of these is called xylem, which carries water and dissolved mineral nutrients upward from the roots.
Young children certainly don't need to memorize the word xylem, but I like introducing real scientific vocabulary when it naturally fits:
“Inside the trunk and branches are tiny pathways that help carry water from the roots to the rest of the tree. Scientists call one of these tissues xylem.”
A Quick Side Note: To help children see how the stem transports water and dissolved nutrients, you can do the celery experiment with them. The colored water gives children a visible representation of substances traveling upward through the plant’s water-carrying tissues. As the color moves through the celery, they can actually see a pathway that is usually hidden from view.

So, what do we want the children to remember?
STEM, TRUNK & BRANCHES: SUPPORT + CARRY
The stem, trunk, and branches support the plant and its leaves, flowers, and fruits, and carry water and nutrients from the roots to other parts of the plant.
Leaves: The Plant’s Food Makers

Leaves are so familiar to children that they can easily be overlooked. We see them everywhere. But when we stop and ask what a leaf actually does, we discover something remarkable.
I like to begin by looking closely at a real leaf and ask:
“Why do you think a plant needs all of these leaves?”
The children may have all kinds of ideas, and this is a wonderful question to simply let them think about for a moment.
Then I introduce one of the most fascinating jobs in the plant:
Leaves help the plant make its own food.
Unlike us, plants don't need to find or eat food. Instead, their leaves use light from the sun, water absorbed by the roots, and carbon dioxide from the air to make sugars that provide the plant with the energy and materials it needs to live and grow.
This process has a wonderfully big scientific name:
Photosynthesis
I don't expect young children to understand all of the chemistry behind photosynthesis—or even to remember the word right away. But just as with xylem, I believe there is value in introducing accurate scientific vocabulary naturally.
I might say:
“Leaves use sunlight, air, and water to make food for the plant. Scientists call this process photosynthesis.”
So, what do we want the children to remember?
LEAVES: MAKE FOOD
Leaves use sunlight, air, and water to make food for the plant through a process called photosynthesis.
Flowers: Helping the Plant Make Seeds

Flowers are often one of the first parts of a plant that catch a child’s attention. They are colorful, sometimes fragrant, and often visited by bees, birds, butterflies, and other insects.
I like to begin with a real flower—or the flowers we added to our tree puzzle—and simply ask:
“What do you notice about the flower?”
The children might notice its color, petals, smell, or the structures in the center. After giving them time to observe and share their ideas, we can introduce the flower’s important job:
Flowers help the plant make seeds.
The beautiful colors and scents of many flowers help attract animals such as bees and butterflies. Many flowers also produce nectar, a sweet liquid that these animals visit the flower to collect.
As a bee or other pollinator visits a flower, a fine powder called pollen can stick to its body.
When it visits another flower, some of that pollen may be transferred to the new flower.
This transfer of pollen from one flower to another is called pollination. Animals that help carry pollen—such as bees, butterflies, and some birds—are called pollinators.
After pollination, another important step called fertilization can take place inside the flower. Fertilization allows the seeds to begin developing.
For young children, I might put it this way:
“Flowers help the plant make seeds. When a bee visits a flower, pollen can stick to its body. As the bee visits other flowers, it carries some of that pollen with it. This is called pollination. After pollination, fertilization can happen, and seeds can begin to grow.”
Just as with xylem and photosynthesis, I don't expect young children to memorize all of these scientific words. But I like introducing accurate vocabulary when it naturally fits what they are observing.
So, what do we want the children to remember?
FLOWERS: HELP MAKE SEEDS
Flowers help the plant reproduce. Pollination and fertilization allow seeds to develop.
Fruit: Protecting the Seeds
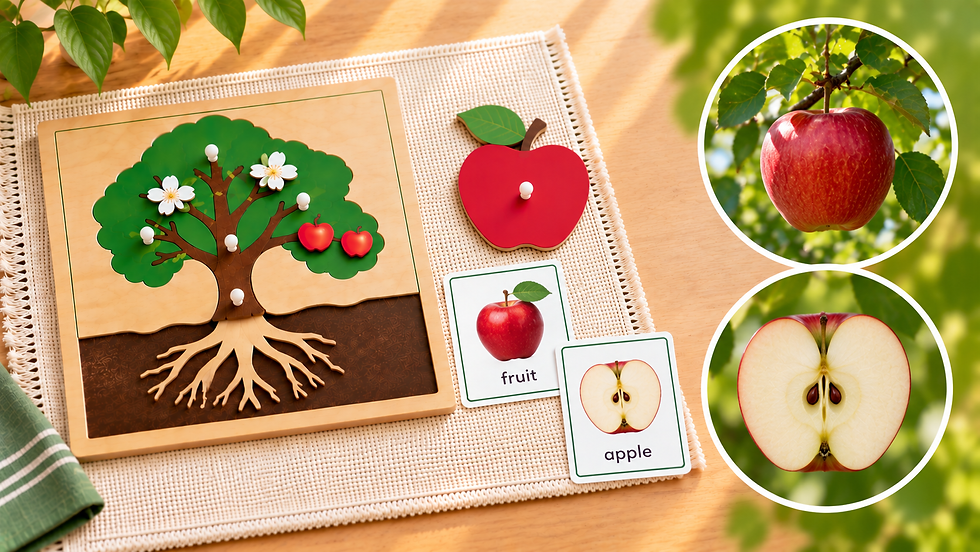
After pollination and fertilization, something exciting begins to happen to the flower: part of the flower begins developing into a fruit.
With our apple tree, this connection is especially easy for children to see. I like to point first to the flower and then to the apple and ask:
“Do you remember what was here before the apple began to grow?”
The apple began with a flower. After pollination and fertilization, the ovary, a part at the base of the flower, begins to grow and develop into the fruit. At the same time, the seeds begin developing inside.
Then, of course, comes the best part: open a real apple.
Before cutting it, I might ask:
“What do you think we will find hiding inside?”
When we cut the apple open, the children can see the seeds for themselves.
“There they are! The fruit has been growing around the seeds, helping to protect them while they develop.”
A Quick Side Note: This is a wonderful opportunity to look beyond the apple and investigate the seeds inside other fruits. Children begin to discover that fruits can look very different on the inside, but they share an important connection: seeds!

But fruits can have another important job too: helping seeds travel.
Many fruits attract animals because of their colors, smells, or taste. When animals eat the fruit, they may carry the seeds away from the parent plant. Some seeds pass through an animal and are deposited somewhere new; others may simply be carried or dropped. In this way, fruits can help with seed dispersal—the movement of seeds to new places.
For young children, I keep the idea simple:
“Fruits grow around the seeds and help protect them. They can also help seeds travel! An animal might eat a fruit and carry its seeds somewhere else. Later, those seeds may end up on the ground in a new place where a new plant can grow.
So, what do we want the children to remember?
FRUITS: PROTECT + SPREAD SEEDS
Fruits protect developing seeds and can also help disperse seeds to new places.
Seeds: Make New Plants

When we open our apple and discover the seeds inside, I like to take one out and let the children look at it closely.
Then I ask:
“What do you think this tiny seed could become?”
It is amazing to think that something so small has the potential to become an entirely new plant.
Inside a seed is a tiny developing plant called an embryo, along with stored food that helps support it when it first begins to grow.
But a seed doesn't begin growing just anywhere. It needs the right conditions. Most seeds need water, oxygen, and a suitable temperature to begin growing.
When a seed begins to grow, scientists call this process germination.
For young children, I might say:
“Inside a seed is a tiny new plant. When the seed has what it needs and begins to grow, we call this germination.”
One of the first things we can observe during germination is a tiny root beginning to emerge. Soon, a shoot begins growing upward, and eventually new leaves appear.
A Quick Side Note: This is the perfect opportunity to watch germination happen in real time! Plant a bean seed in a transparent cup and invite the children to observe as the seed opens, the first root appears, and a tiny new plant begins to grow.
Pair the observation with a seed-to-plant life cycle material so children can match what they see each day to the different stages of growth.

And suddenly, we are right back where we started our investigation—with the roots.
So, what do we want the children to remember?
SEEDS: MAKE NEW PLANTS
Seeds contain a tiny developing plant. When conditions are right, a seed can germinate and begin growing into a new plant.
And now our journey around the plant is complete:
Roots → Stem, Trunk & Branches → Leaves → Flowers → Fruits → Seeds → New Plant
Every part has a special job, but none of these parts works completely on its own.
Together, they help the plant survive, grow, and make new plants.
Final Thoughts
From the roots beneath the soil to the seeds inside a fruit, every part of a plant has an important job—and all of those parts work together to help the plant live, grow, and make new plants.
By moving beyond “What is this part?” to “What does this part do?”, we help children see plants in a whole new way.
And the best part? The learning doesn't have to stop with the lesson.
Go outside. Look closely. Ask questions. And keep discovering.


Comments